[🌸] SPAWNING [🌸]

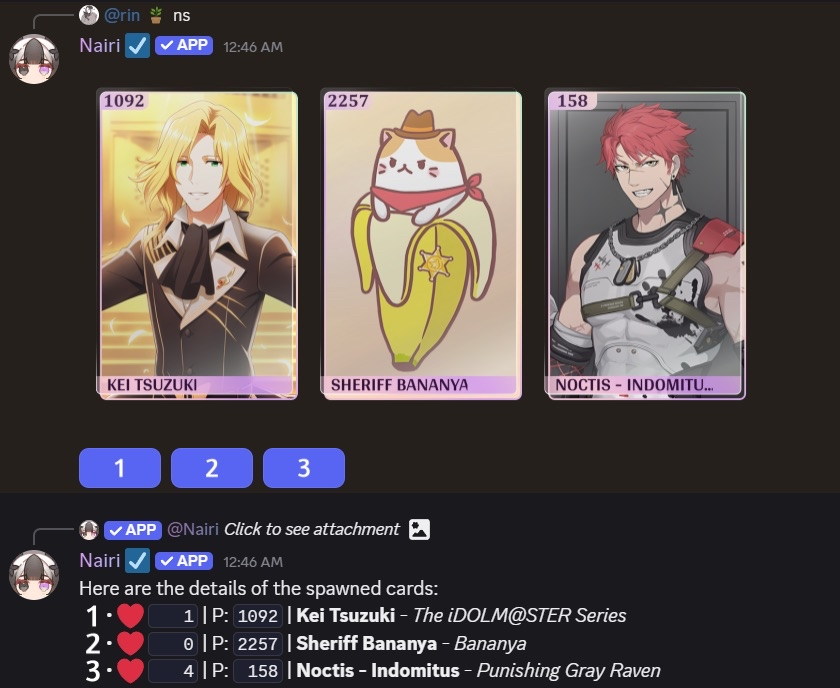
- You can spawn a set of three cards using these commands: <p>S or <p>Spawn.
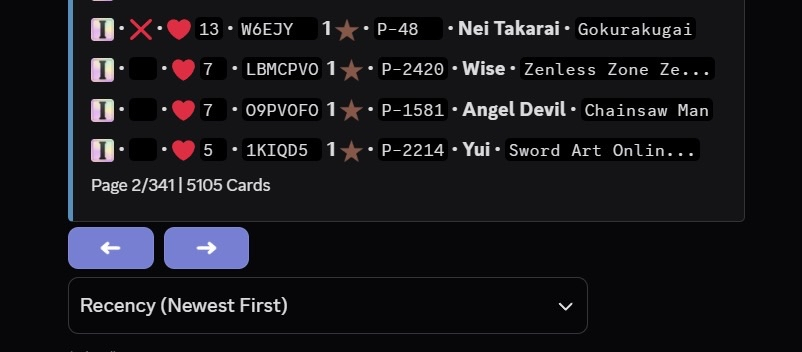
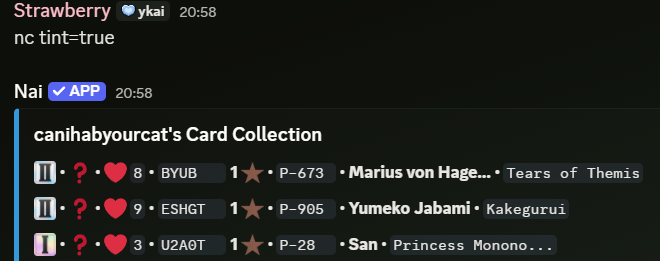
- When you spawn, the following details for the three cards will also show in the order:
- Wishlist count – Print number – Name – Series
- When you spawn, the following details for the three cards will also show in the order:
- You can also do extra spawns with <p>W or P<Wish>:
- Note: each extra spawn costs 1
 , as well as each extra claim. They can be purchased by running the <p>Buy wish or <p>Buy claim command.
- Note: each extra spawn costs 1

[🌸] PRINTS [🌸]

[🌸] TIERS [🌸]

We currently have two tiers in the bot:  Tier 1 (T1) and
  Tier 2 (T2).
- Tier 1: Our first and most common cards, their prints can range anywhere between 1-2500 and you can get them by spawning.
- Tier 2: A bit rarer than T1s, not all characters will have a T2 variant. Their prints can range anywhere between 1-999 and you can get them by spawning.
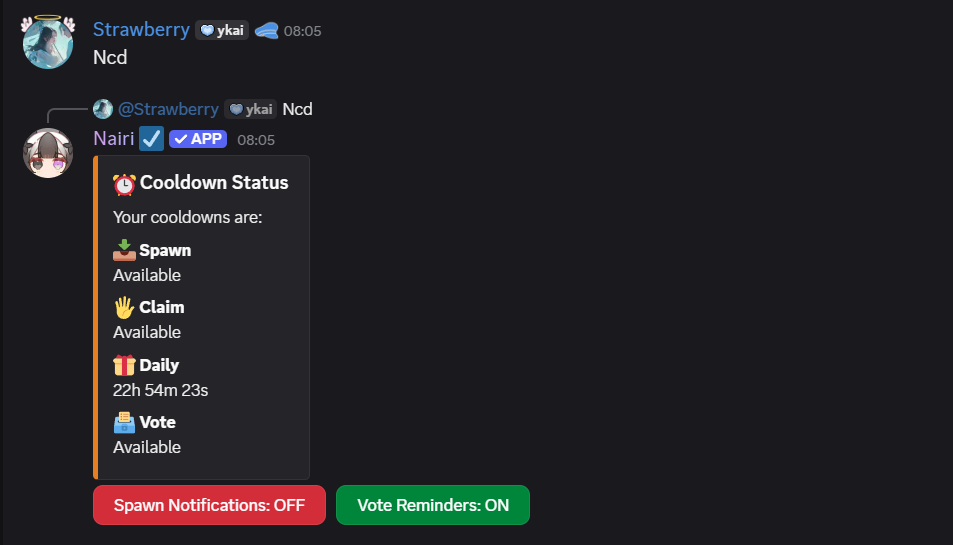
[🌸] COOLDOWN [🌸]

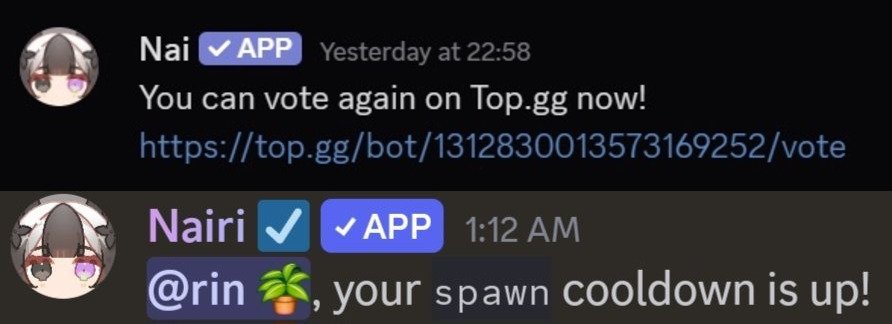
[🌸] NOTIFICATIONS [🌸]

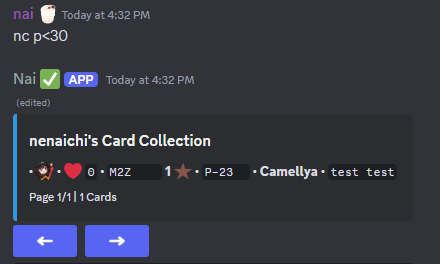
[🌸] COLLECTION [🌸]

[🌸] CARD FILTERS [🌸]

[🌸] TAGS [🌸]

Tags are used to group cards for a better organization of your collection. These are the available commands for tags:
Create a tag:
- To create a tag use: <p>tc <tagname> <emoji> or <p>tagcreate <tagname> <emoji>.
- Example: <p>tc favourites .
- Note: you can now use custom emojis for tags. Keep in mind Nai needs to be in the server the emoji is from. If Nai is no longer a member of the server, the tag emoji will be shown as .
- Example: <p>tc favourites
 .
.
Delete a tag / untag a card:
- Tags can be deleted at any time by using: <p>Td <tagname> or <p>Tagdelete <tagname>.
- To untag a card use: <p>Rt <cardcode> or <p>Removetag <cardcode>
- Example: <p>Rt m2z
- Note: cards from deleted tags will become untagged.
Editing and & assigning a tag:
- You can edit a tag’s emoji or name by using: <p>Te <tagname> or <p>Tagedit <tagname>.
- To assign tags to your cards, run the command: <p>T <cardcode> <tagname> or <p>Tag <cardcode> <tagname>.
- Example: <p>T m2z favourites
- Note: running the <p>t <tagname> command without specifying a card code will tag the latest card you claimed.
Checking your tag list:
- You can check your own tag list by running the command <p>Tl or <p>Taglist.
- You can also check someone else’s tag list by running the command <p>Tl <user> or <p>Taglist <user>.
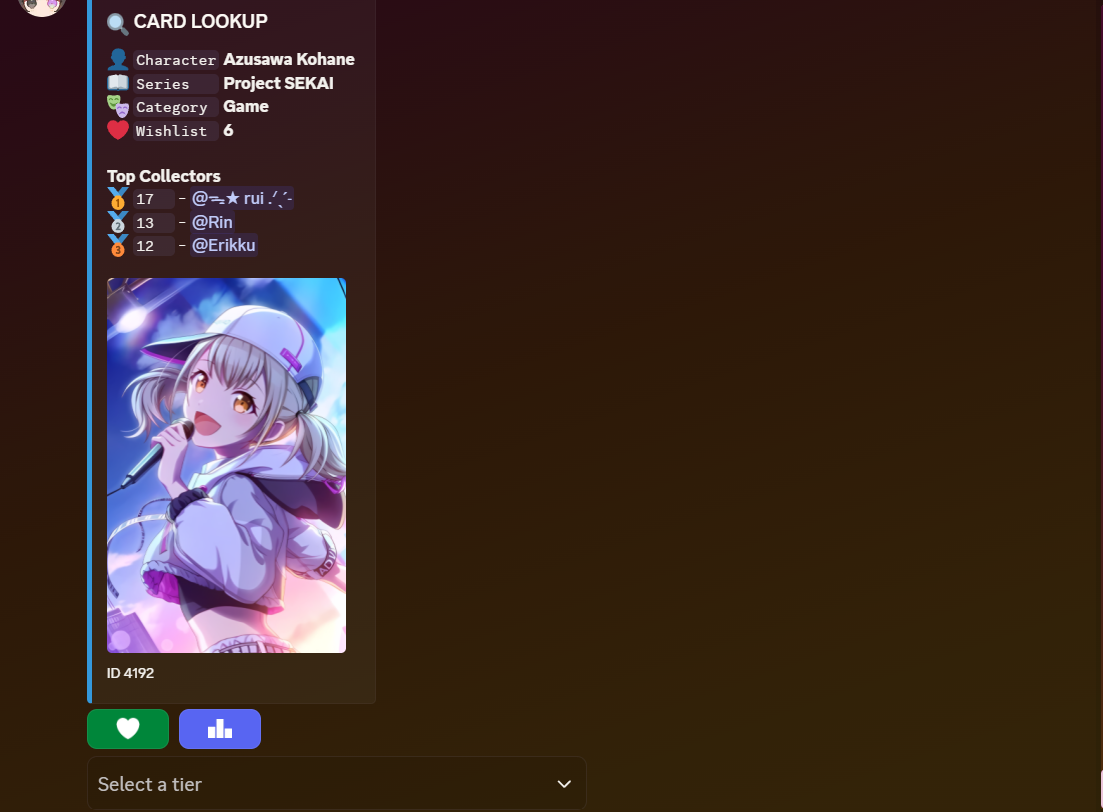
[🌸] CHARACTER & SERIES LOOK UP [🌸]

You can search any character and series available in Nairi.
- To look up a series, run the command: <p>Sl <seriesname>.
- To look up characters, run the command: <p>Lu <charactername>.
- You can also check the 10 lowest print of each character by clicking . This is commonly known as the leaderboard.
- Note: T1 and T2 do not share the same print leaderboard. However, every tier will share the same top three collectors.
 . This is commonly known as the leaderboard.
To check the available tiers for each character, use the drop-down shown below:
- Example: To view the T2 variant of a character, click on the drop-down menu and select “Variant 2″. Note that not all characters will have a T2 variant.
[🌸] WISHLISTING [🌸]

 . If you wish to remove the character from your wishlist, click again.
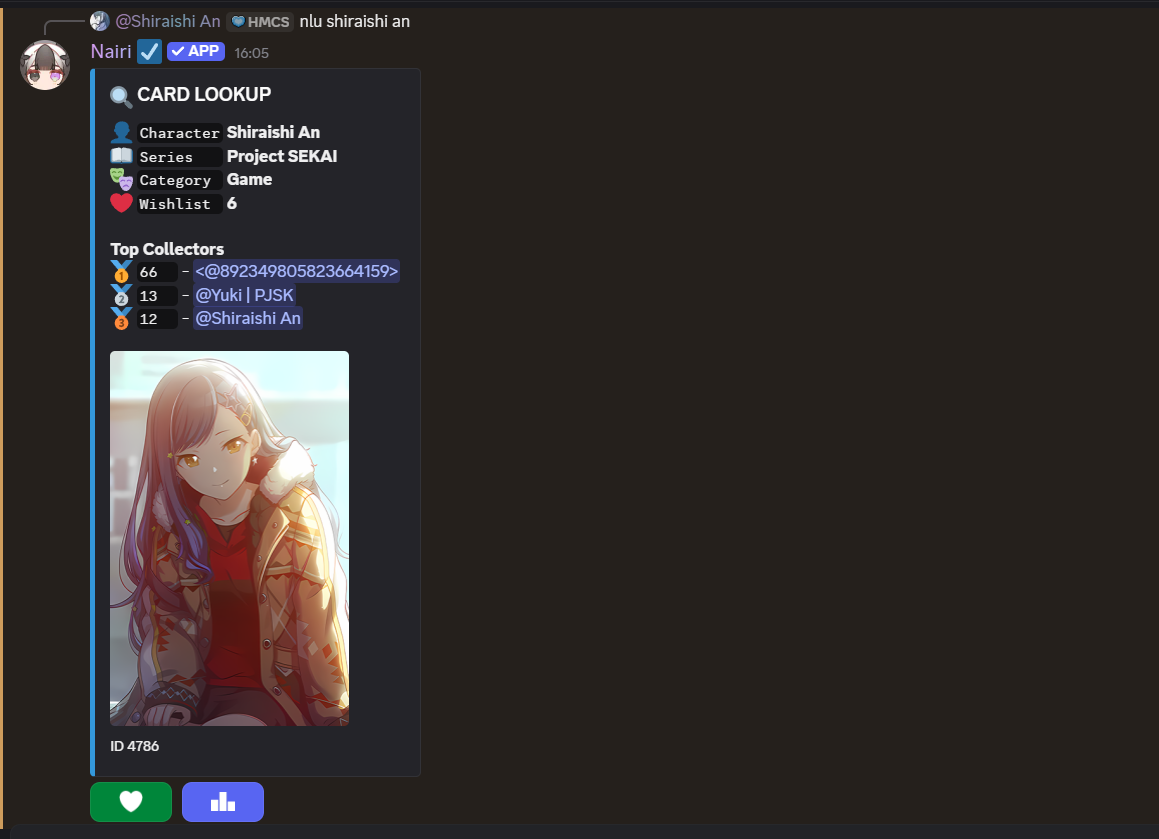
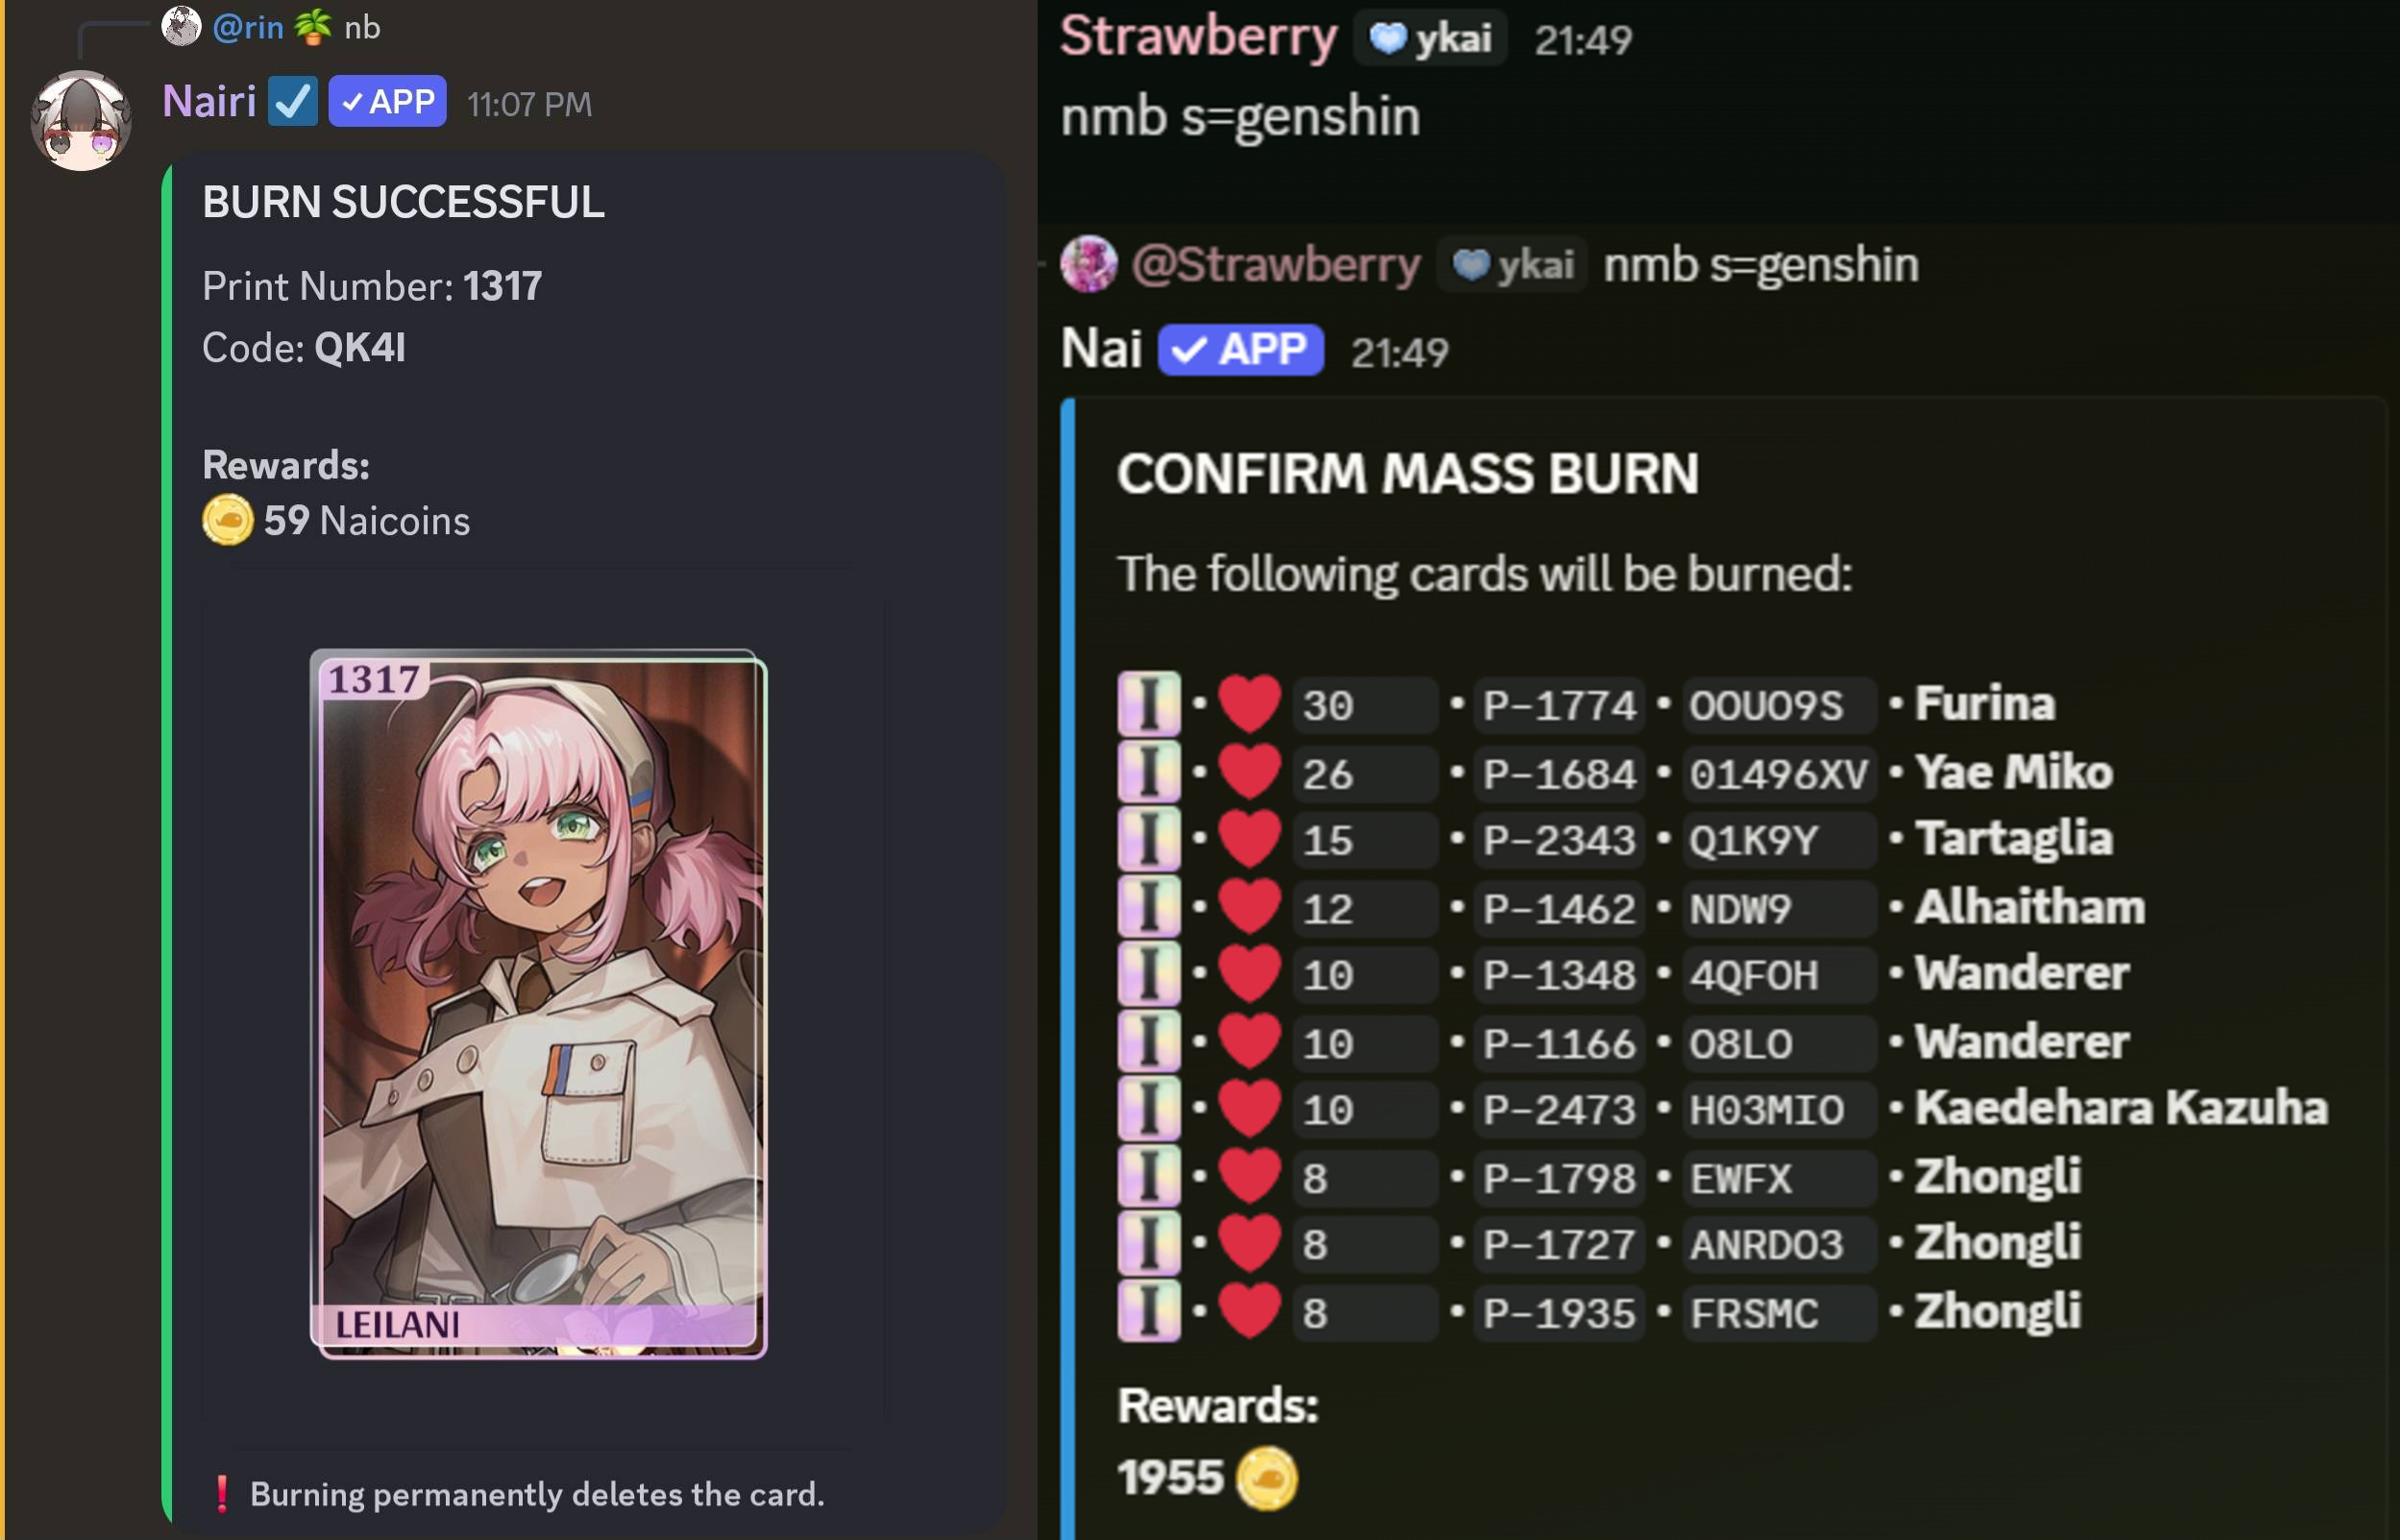
[🌸] BURNING [🌸]

[🌸] HUES [🌸]

Hue Commands:
- To apply a hue, run the command <p>Hue <cardcode>.
- You can reroll by clicking the button, but note that each roll costs 200 .
- You can reroll by clicking the
- to remove a hue, run the command <p>Rmh <cardcode.
- Removing a hue costs 500 .
- Removing a hue costs 500

 .
.How it works:
- It operates in the HLS color space and rotates the colors using the angles in the color wheel.
- It preserves the original saturation (intensity of color) and lightness (brightness / darkness of a color), mostly.
Notes:
- Hues can only roll gradients for unframed cards because the original regular frame already has a gradient. This won’t always be the case for custom frames.
- Depending on their design, custom frames might look messier with a hue applied. Results can vary a lot.
Pros:
- Full re-coloring of the frame.
- Makes unframed cards look pretty and unique, still.
- Works great on mostly flat/simple frames.
- Creates a strong visual variety between cards.

Cons:
- Can flatten or mute details on ornate or more detailed frames.
- May blur metallic, glows or detailed effects in a frame.
- Grayscale or low saturation areas may barely change or become the same color.
- Struggles with similar-looking colors, especially if they are low in saturation or close in lightness (i.e grey and a darker grey would get recolored into the same exact tone, removing contrast).


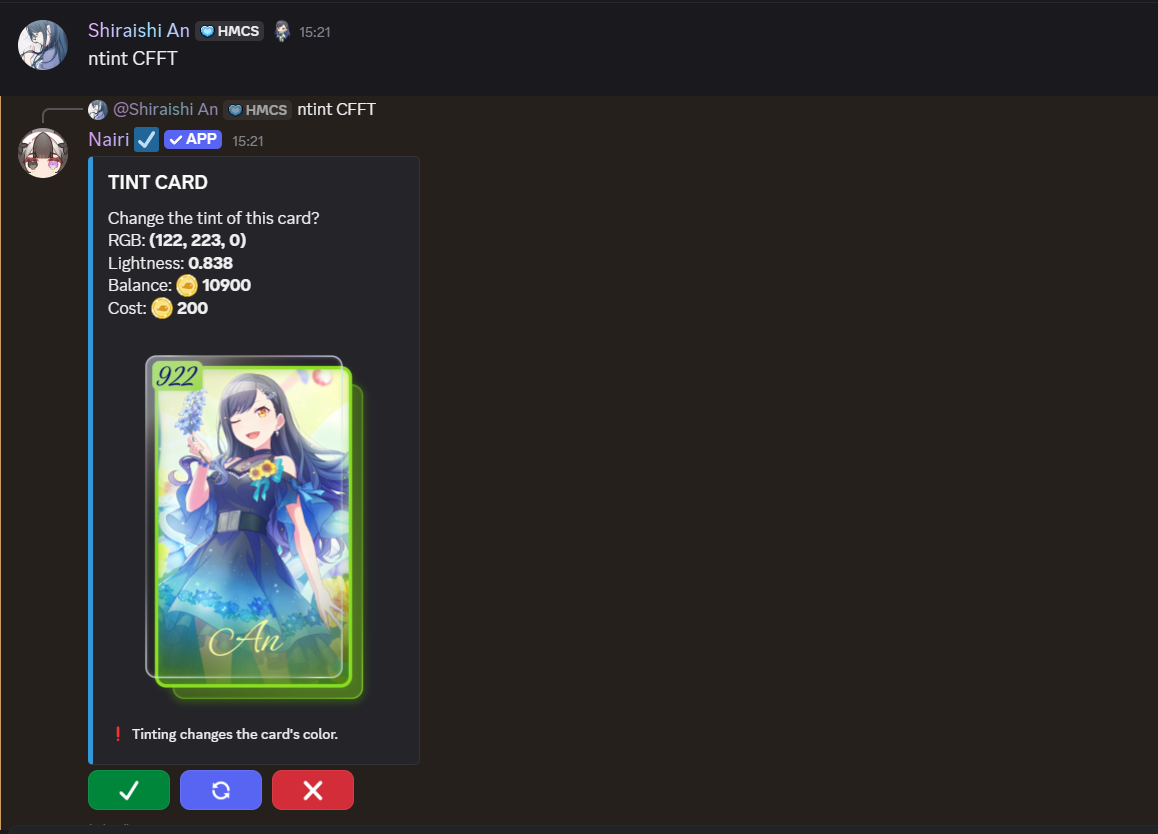
[🌸] TINTS [🌸]

Tint Commands:
- To apply a tint, run the command <p>Tint <cardcode>.
- You can reroll by clicking the button, but note that each roll costs 200 .
- You can reroll by clicking the
- to remove a tint, run the command <p>Rmt <cardcode.
- Removing a hue costs 500 .
- Removing a hue costs 500
How it works:
- A random RGB color is chosen and blended over the frame.
- The frame’s original colors are still there underneath, but they’re now influenced by the tint.
- The lightness value controls it’s strength and opacity (how strong or soft the tint is, essentially)
Notes:
- Tint doesn’t replace the original frame’s colors, it blends with them.
- The more intense the tint and the brighter the lightness, the more dominant the effect becomes.
Pros:
- Preserves textures, shadows, glows and details.
- Works great on both ornate/drawn and flat frames.
- Can shift tone/mood subtly or dramatically.
Cons:
- Doesn’t fully change the original colors.
[🌸] RARE TINTS & HUES [🌸]

[🌸] FRAME RECOLORING [🌸]

Tips for choosing between a hue and a tint when applying to a custom frame:
- Simple frames:
(i.e Royalty and Grunge_Stub)- Both hue ant tint work great with frames that are simply colored and don’t have a lot of texture or detail.
- Ornate / detailed / metallic frames:
(i.e Thornveil, Crimson_scroll and Goth)- Tint would look best for these kind of frames, as it will keep the shines, glows, engraving, and more details.
- Hue can flatten the depth, mess up similar colors and turn shiny metal into flat colors.
- Painted / stylized frames:
(i.e Dandelion_Dream and Heavenly_Gaze)- Tint would preserve all original details, shadows and highlights.
- Hue would merge and flatten colors, remove contrast and make details look unnatural.
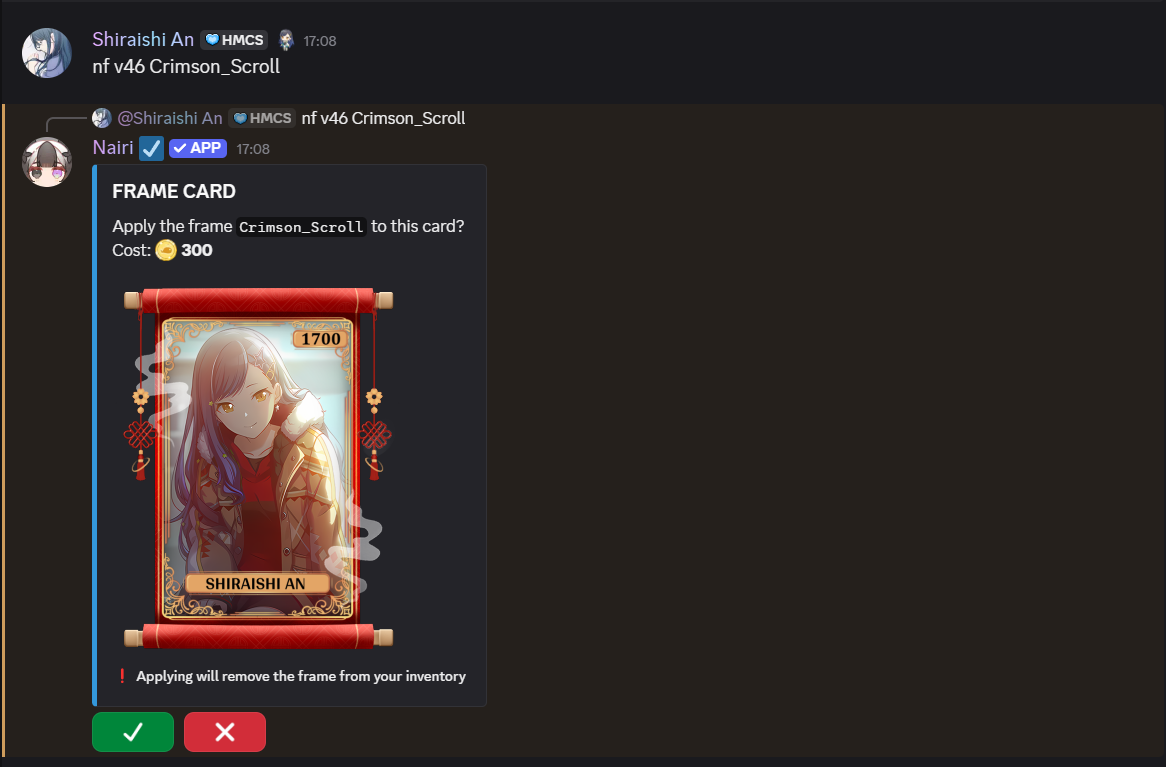
[🌸] FRAMES [🌸]

Frames are cosmetics that can be applied to cards. Each tier have their own frames, meaning that T1 frames can only be applied to T1 cards.
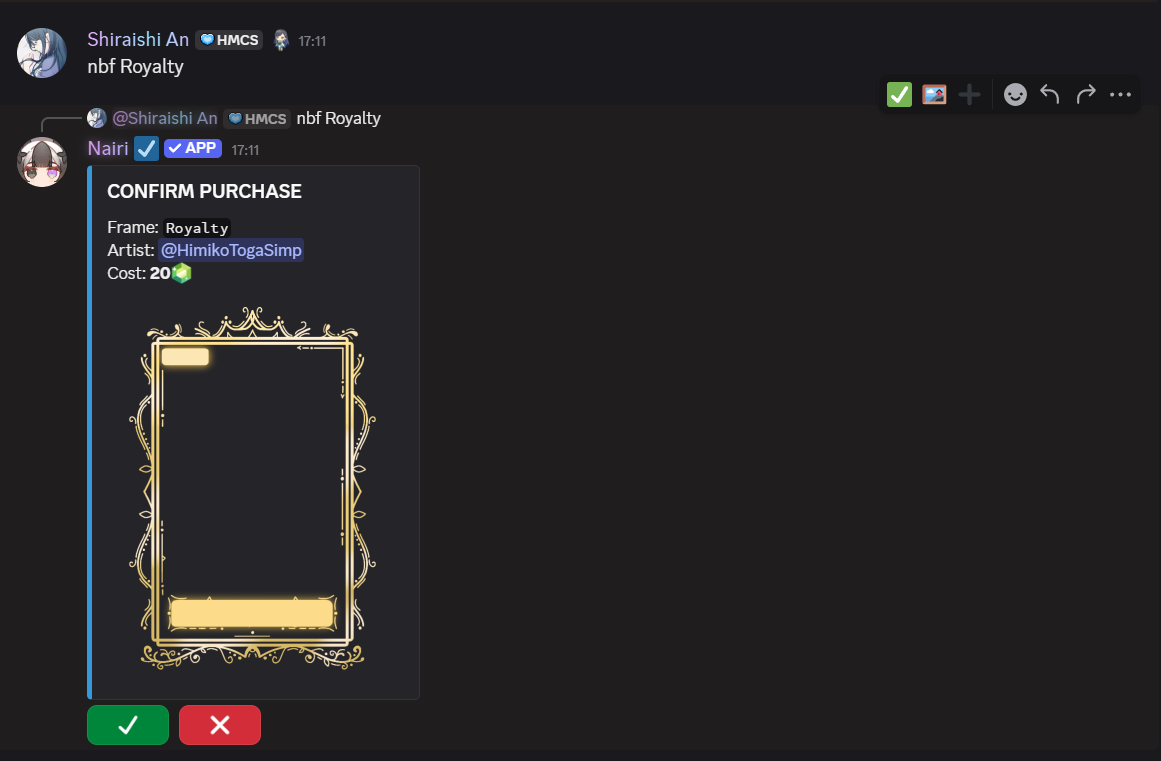
Apply a frame:
- You can now apply frames by using <p>F <cardcode> <framename> or <pf>Frame <cardcode <framename>.
- Applying a frame costs 300 .
- Note : running the <p>F command without specifying a card code will apply the frame to your latest card.
- Applying a frame costs 300
Remove a frame:
- You can remove a frame with <p>Rmf <cardcode> or <p>Removeframe <cardcode>.
- removing a frame costs 300 .
- Note : running the <p>Rmf command without specifying a card code will apply the frame to your latest card.
- removing a frame costs 300

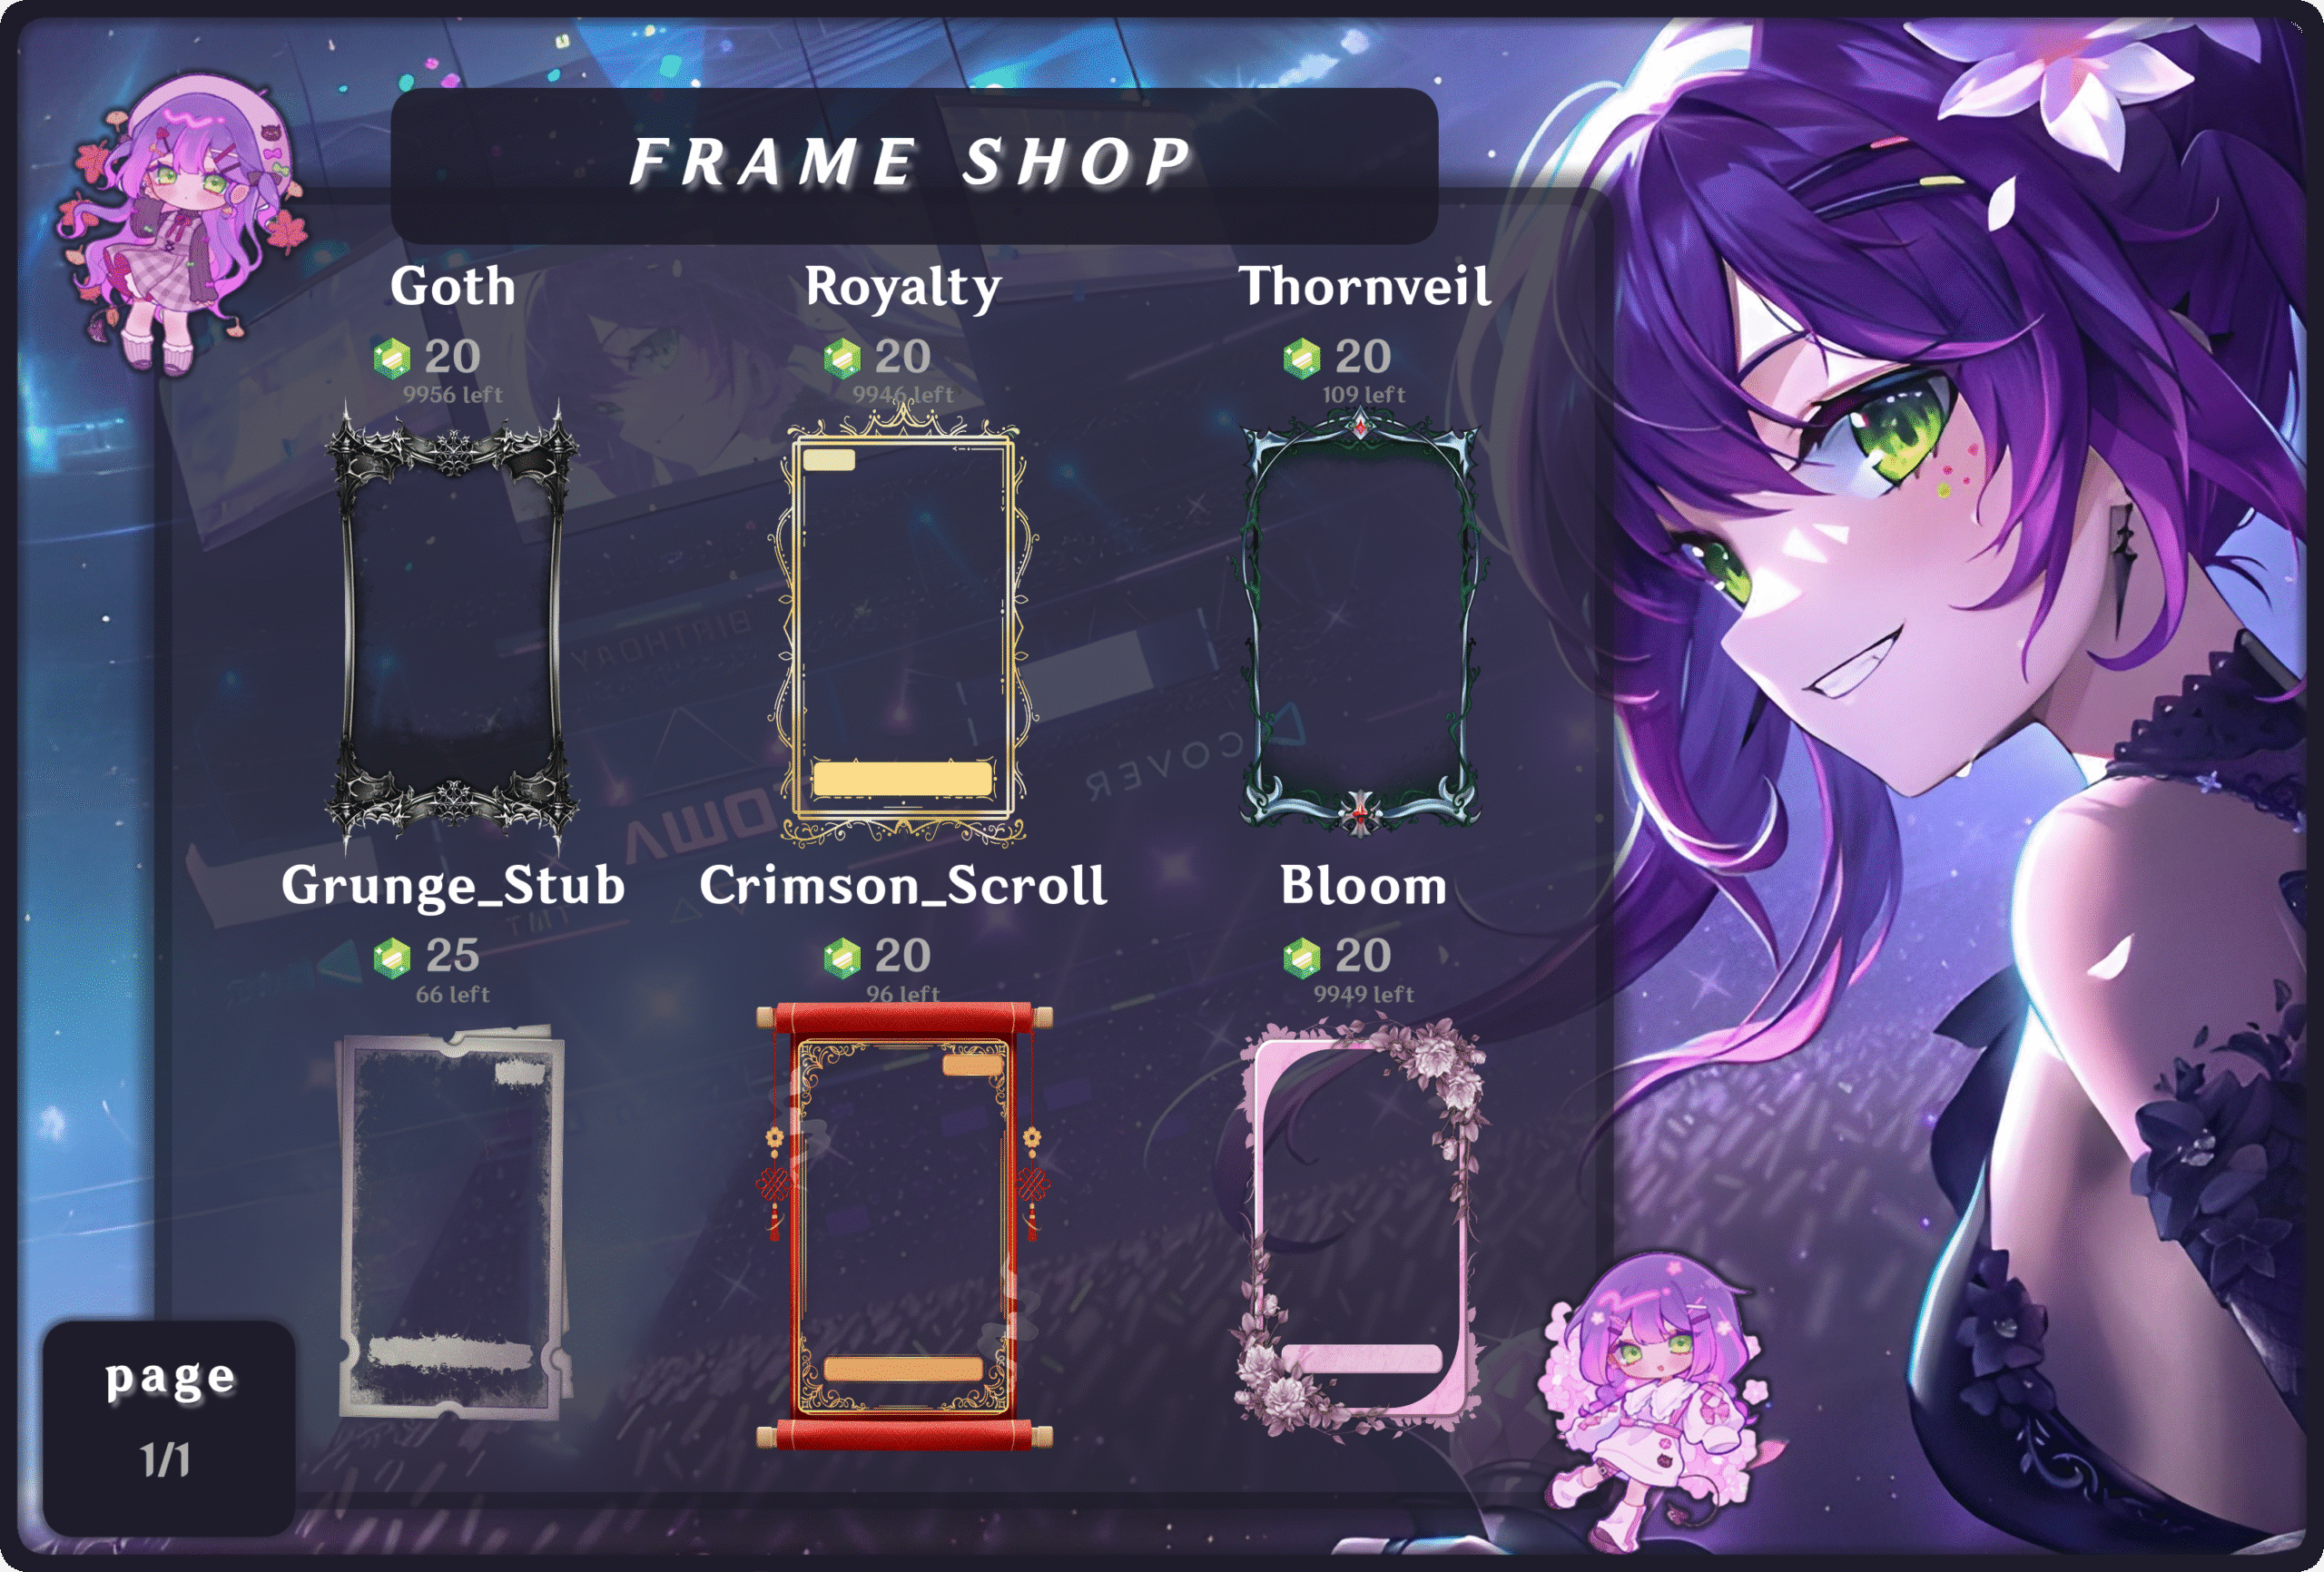
[🌸] FRAME SHOP [🌸]

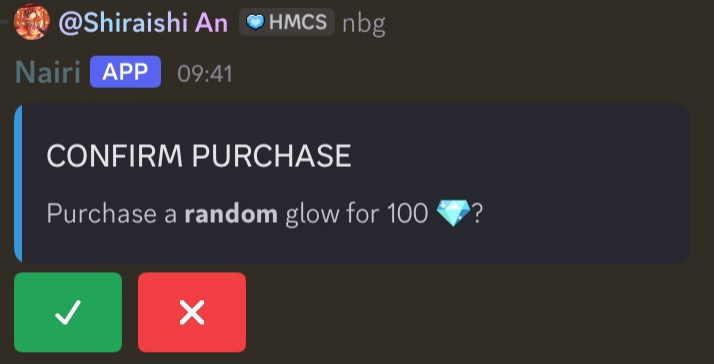
[🌸] BUYING GLOWS [🌸]

Glows are a cosmetic that makes the outside of your card glow, as the name suggests.
- You can buy a glow by running the command: <p>bg or <p>buyglow. They cost 100 each.
- You can get a random glow color based on the RGB color spectrum.
[🌸] GLOW COLLECTION [🌸]

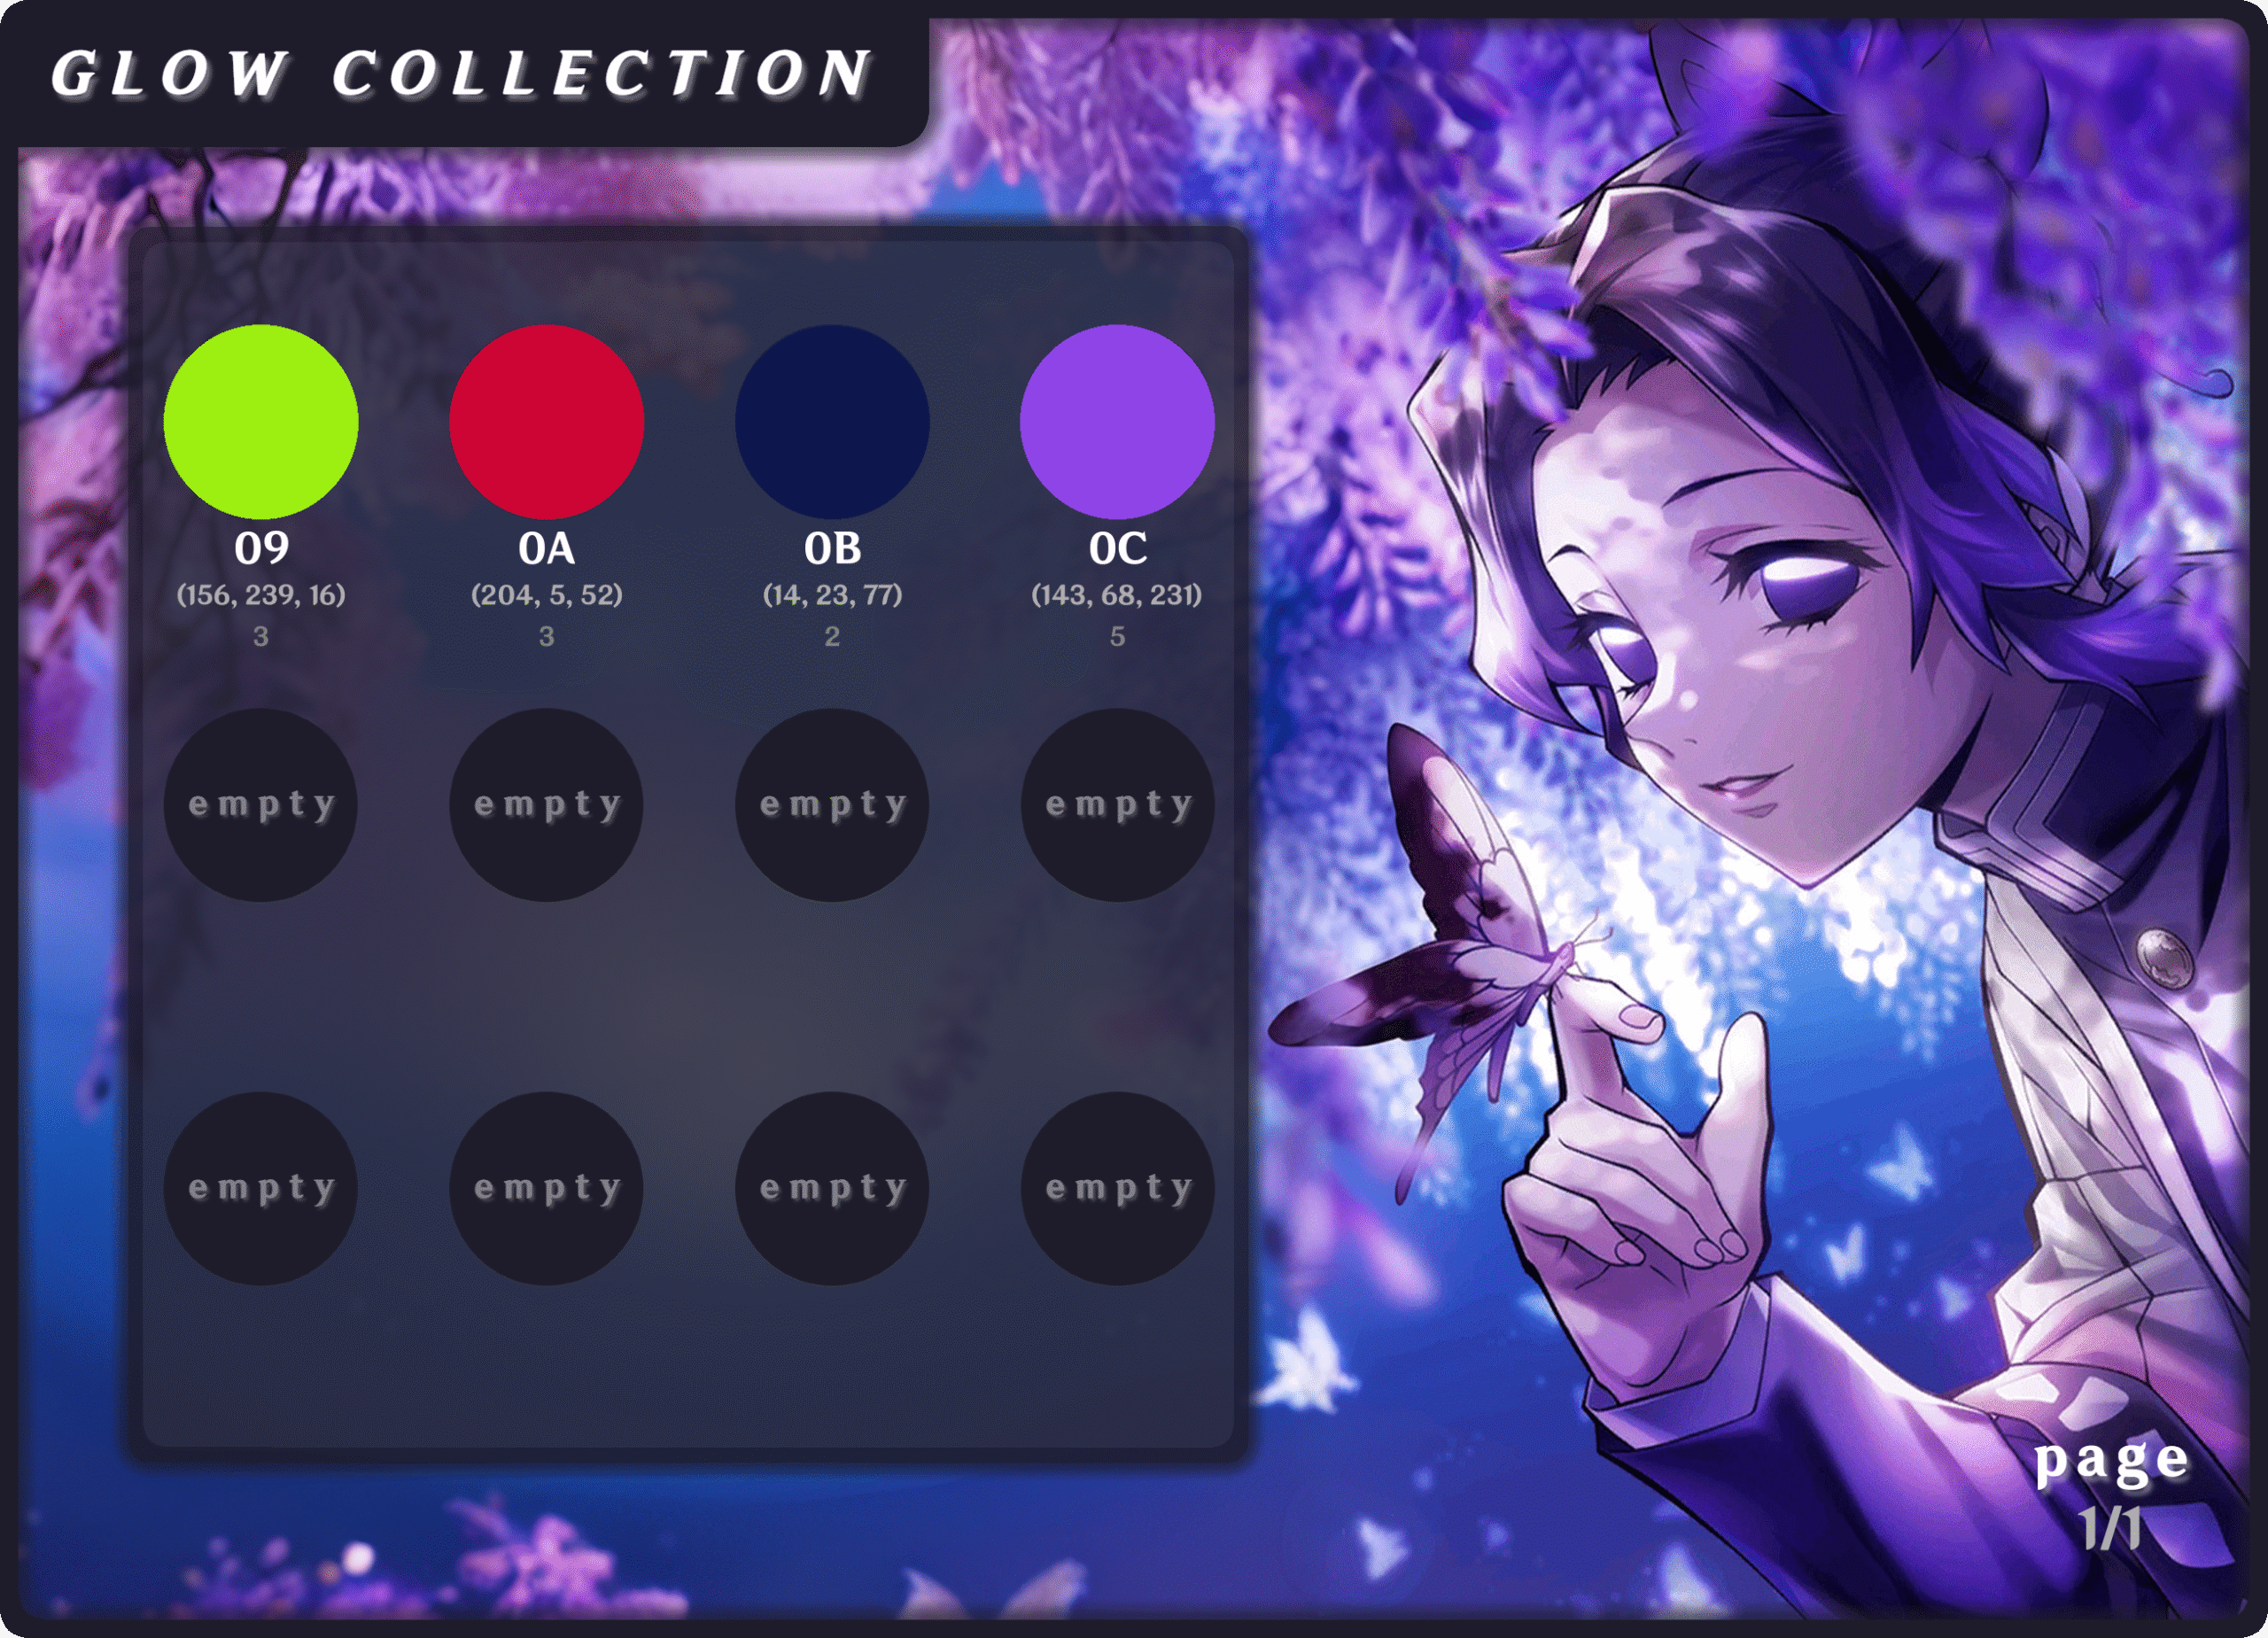
Apply a glow:
- You can glow a card by running the command <p>Glow <glowcode> <cardcode>.
- Applying a glow costs 20 .
- Applying a glow costs 20
- Glows currently have an unlimited number of uses, meaning you can use one glow at any time.
- The cost is currently 20 per use.
- The cost is currently 20
- To unglow a card, run the command <p>rmg <cardcode>.
- Removing a glow costs 500 .
- Removing a glow costs 500
 .
.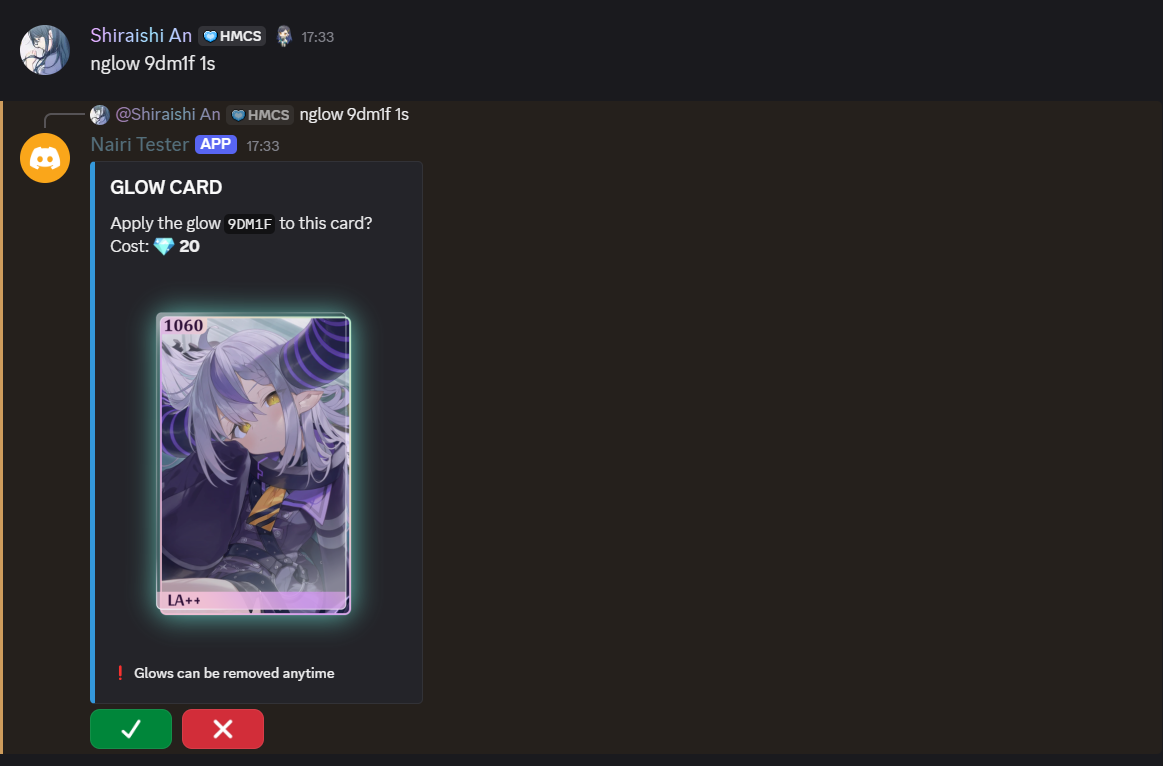
[🌸] GLOW TESTING [🌸]

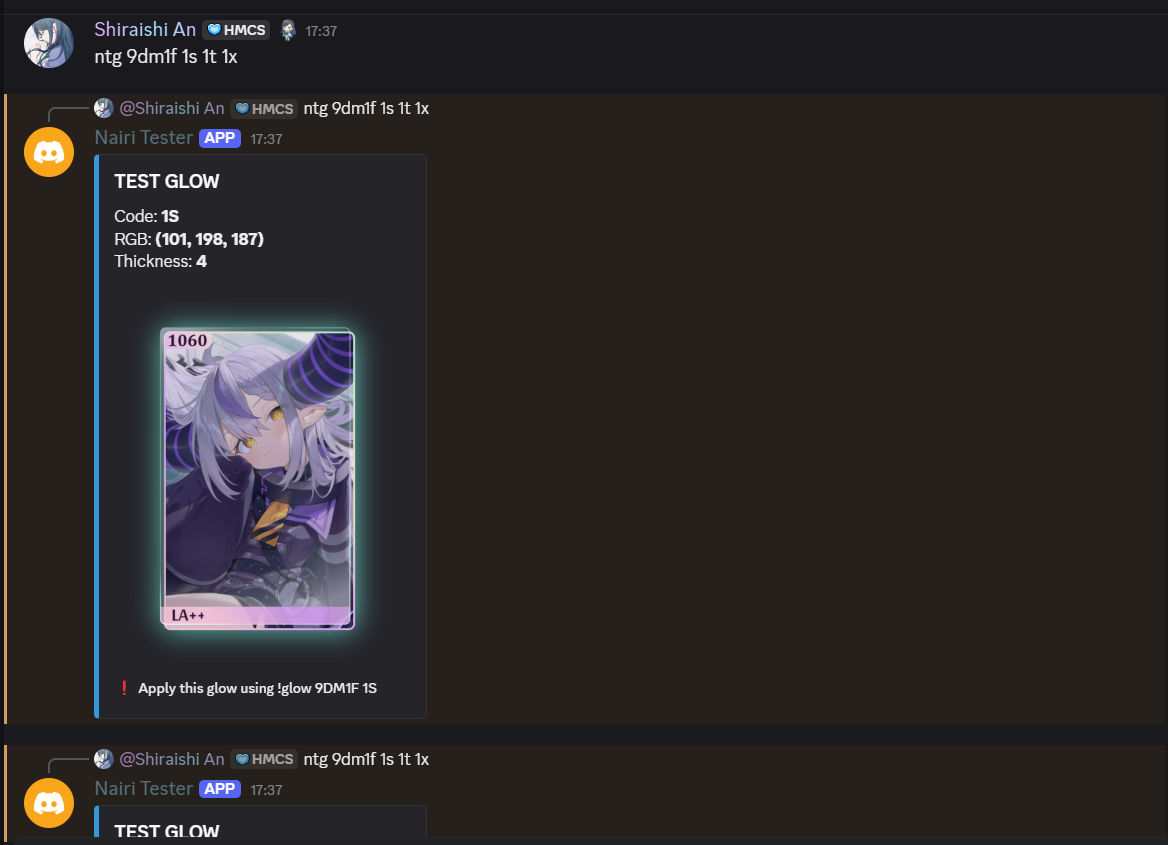
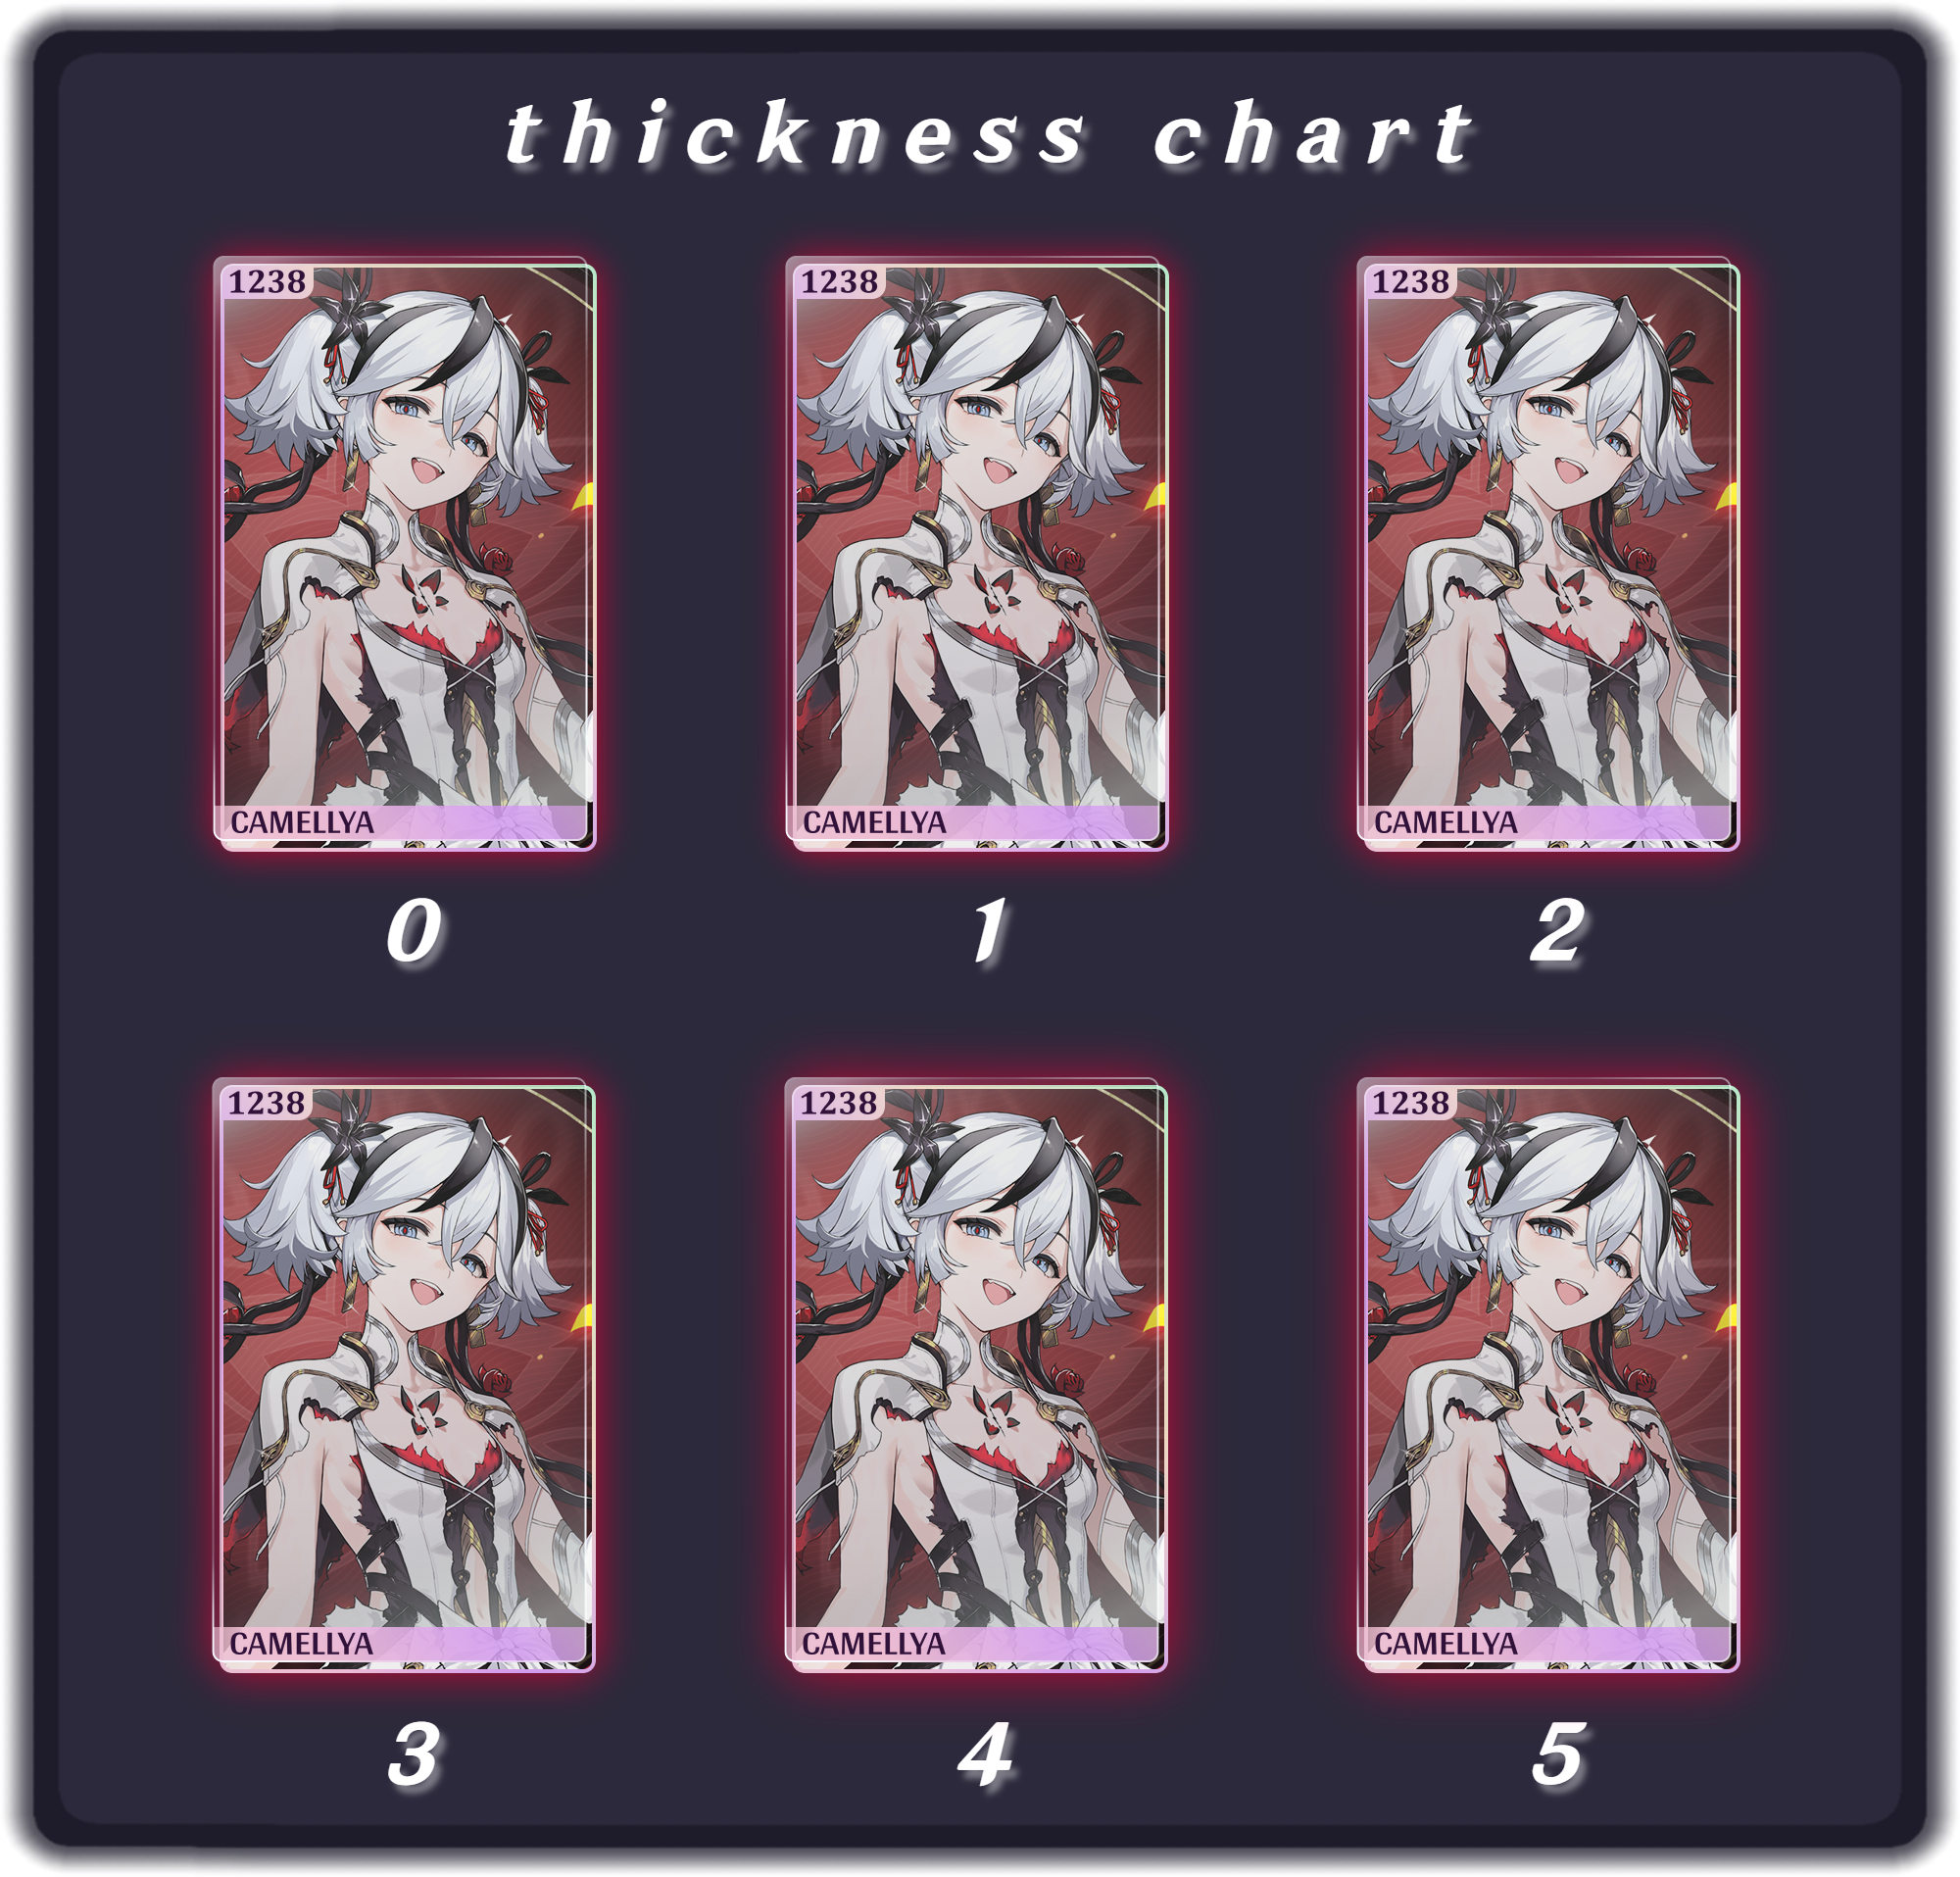
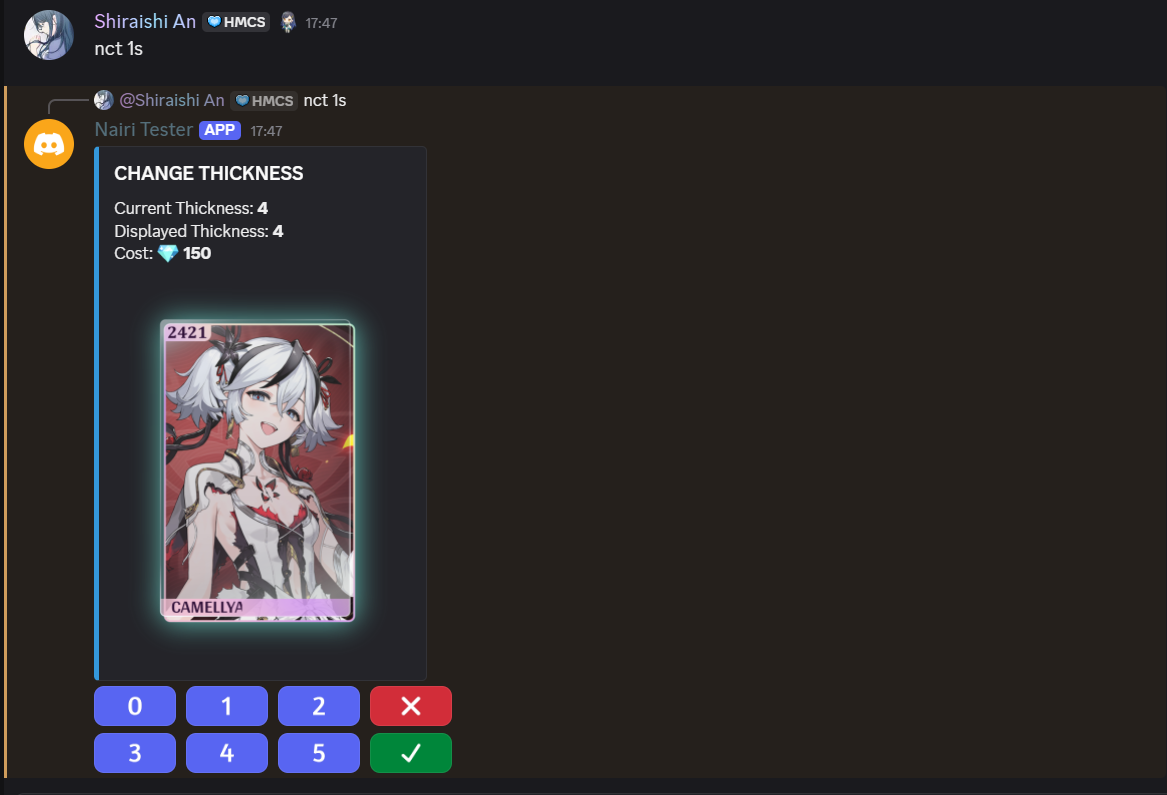
[🌸] GLOW THICKNESS [🌸]

Glow thickness ranges from 0-5. Changing a glow’s thickness costs 150
.- To change a glow’s thickness, run the command <p>Ct <glowcode> or <p>Changethickness <glowcode>.
- We currently have 6 thickness levels to choose from: